
Brown Sugar-Pineapple Rum Glaze
Golden, Spiced, Glossy

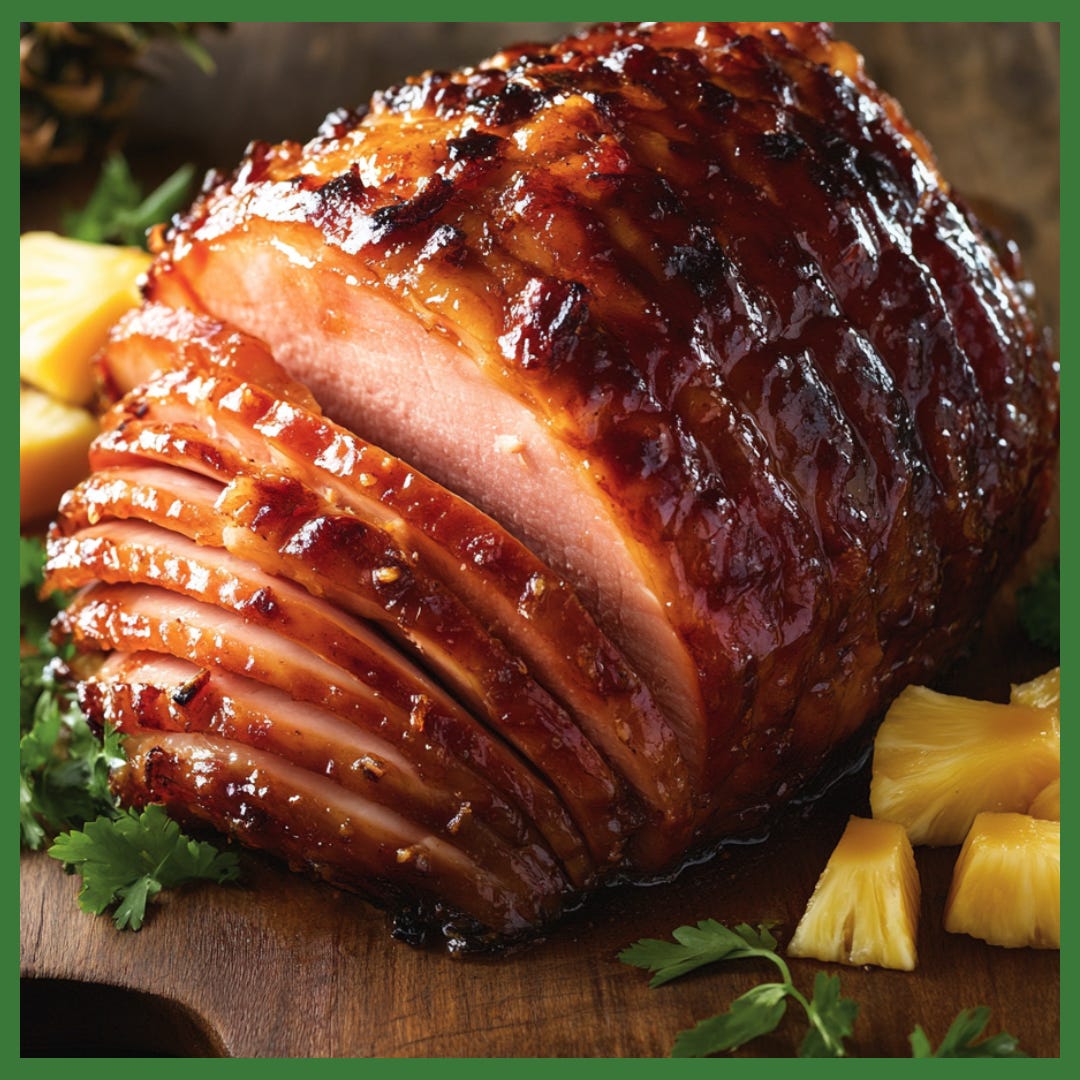
Some glazes just coat a ham. This one transforms it.
The combination of brown sugar, pineapple juice, and Kōloa Spice Rum creates a glaze that is glossy, deeply flavorful, and balanced between sweet, tangy, and warm spice. Imagine pulling a ham from the oven with a caramelized crust that glistens in the light, filling the room with aromas of vanilla, roasted sugar, and gentle island spice. Every slice is tender, juicy, and kissed with tropical flavor that lingers on the palate.
In this article, I’ll walk you through how to create a foolproof ham glaze that works for both holiday centerpieces and casual Sunday dinners. You will learn how to score and prepare a ham so the glaze seeps into every layer, when and how often to baste for maximum flavor, and how to finish under the broiler without burning the sugar. I’ll also share tips on choosing the right ham, adjusting the glaze if it thickens too much, and pairing suggestions that make the whole meal come together effortlessly.
Along the way, you’ll discover a little food history too: why cooks began glazing hams with sugar in the 1800s and how that same tradition continues to bring both beauty and flavor to our tables today.
This is more than a glaze, it’s a technique that elevates a simple ham into a memorable feast.
Servings: Enough for a 7 to 10 lb. ham
Ingredients
1 cup brown sugar
1/2 cup pineapple juice
1/4 cup Kōloa Spice Rum
2 tbsp Dijon mustard
1/4 tsp ground cloves
1/4 tsp ground cinnamon
1 tbsp butter
Instructions
Choosing the Right Ham
Spiral-Cut Ham
Why it works: Already sliced, so the glaze seeps between layers effortlessly. Guests can serve themselves without hacking into a whole ham.
Best for: Large gatherings or when presentation matters, since every slice looks uniform.
Watch out for: Pre-sliced hams can sometimes dry out at the edges. Generous glazing during baking helps keep them moist.
Whole Ham (unsliced)
Why it works: Retains moisture beautifully and gives you more control over thickness of each slice.
Best for: Traditional holiday tables where carving at the table is part of the ceremony.
Watch out for: Takes a little more time to carve and needs scoring so the glaze penetrates deeply.
Bone-In vs. Boneless
Bone-in: Adds flavor and juiciness. The bone helps conduct heat for more even cooking. Leftover bone is perfect for soups or beans.
Boneless: Easier to slice for sandwiches and weeknight meals. Slightly less flavorful but very convenient.
Weight and Size
Aim for 7–10 lbs if serving a group (feeds 10–14 people).
Remember: A bone-in ham yields less meat per pound than boneless since you’ll lose weight to the bone. Plan about ¾ pound per person for bone-in and ½ pound per person for boneless.
Prepare the Ham
Let the ham sit at room temperature for 30 to 60 minutes before baking so it cooks more evenly.
Scoring the Ham
Scoring isn’t just for looks - it’s a culinary trick that makes your glaze work harder.
Why Score: Shallow cuts create more surface area, letting the glaze seep into the meat instead of sliding off. It also encourages a crisp caramelized crust where the lines meet.
How Deep: Use a sharp chef’s knife to cut ¼ inch deep into the fat layer, but not into the meat itself. This keeps the ham juicy while still opening it up to flavor.
Pattern Options:
Diamond Pattern (classic): Cut parallel lines about 1 inch apart, then rotate 45 degrees and cut again to form diamond shapes. Adds elegance and maximizes glaze coverage.
Straight Lines (modern): Cut parallel lines across the ham in one direction for a simpler look.
Extra Touch: Press a whole clove into the center of each diamond for a traditional holiday presentation with warm spice aroma.
Simmer the Glaze
In a medium saucepan over medium heat, whisk together brown sugar, pineapple juice, Kōloa Spice Rum, Dijon mustard, cloves, and cinnamon. Stir often until the sugar dissolves and the mixture is glossy, about 5 to 7 minutes.
Begin Baking the Ham
Preheat oven to 325°F (163°C). Place the ham on a rack in a roasting pan. Cover loosely with foil and bake according to package directions, roughly 15 minutes per pound for precooked ham.
Glaze During Baking
During the final hour of baking, brush the ham generously with the glaze every 20 minutes. If using a spiral ham, spoon some of the glaze between the slices. Allow each coat to caramelize slightly before adding the next.
Broil for Caramelization
Remove the foil and broil for 2 to 3 minutes at the very end for an extra glossy, slightly crisp finish. Watch closely, as sugar burns quickly under high heat.
Rest and Serve
Tent the ham with foil and rest 10 to 15 minutes before slicing. Drizzle with any remaining glaze for added shine and flavor.
Make-Ahead Tip
The glaze can be prepared 1–2 days in advance. Simply simmer as directed, let it cool, and store it in an airtight jar in the refrigerator. When you are ready to use it, gently rewarm over low heat, whisking in a splash of pineapple juice or rum if it has thickened too much.
This saves time on the day of your feast and allows the flavors of the rum and spices to mingle even more.
Tips and Ideas
Cooked vs Uncooked: Most grocery hams are precooked. If using uncooked, adjust bake time (about 20 minutes per pound until 145°F internal temp).
Glaze Consistency: If it thickens too much while resting, stir in a splash of pineapple juice or rum.
Serving Suggestions: Pair with roasted sweet potatoes, steamed green beans, cornbread, or a fresh tropical fruit salad.
Why It Works
The brown sugar caramelizes into a golden crust, pineapple juice adds brightness, Dijon mustard cuts through with savory tang, and Kōloa Spice Rum deepens everything with warmth and subtle spice. It’s balance in every bite.
Fun fact: In the 19th century, glazing hams with sugar and fruit juices was a way to preserve them and add flavor. That tradition lives on, not just as preservation, but as a celebration of sweetness meeting savory richness.
Best Served At
Holiday feasts
Sunday suppers
Dinner party centerpieces
This glaze is a little bit traditional, a little bit tropical, and guaranteed to impress.
Community & Subscription
If you enjoyed this post and want to explore more rum-inspired recipes and island flavors, consider becoming a paid subscriber. You’ll unlock exclusive recipes, full archive access, and community discussions where flavor and creativity come together.
Mahalo nui loa,
Nicole
The Island Spirit Kitchen
Subscription Tiers
🟢 Free Subscriber – $0/month
1 free recipe per month, sent to your Inbox
Seasonal inspiration
Ad-free reading
🟡 Paid Subscriber – $7/month or $70/year
2 exclusive recipes per month plus ‘bonus’ content'
Full recipe archive
Advanced culinary tips and tutorials
Access to paid-only discussion forum
🔴 Spirited Supporter – $275/year
Everything in Paid
Early access and previews
Bonus content
Direct access to the author
Hardcover copy of The Island Spirit: The Ultimate Guide to Rum-Infused Cocktails and Cuisine. ($90 value)